Think about how many times you’ve sent out an email in the past month. Now think about how many times you got a reply.
Maybe your emails don’t have a personalized email signature included at the bottom?
If you don’t have an email signature set up – it’s about time you set one up now!
Whether you’re just starting out or looking for ways to improve your current email signature, read on for advice to help you stand out from the crowd.
What Is An Email Signature?
An email signature is a block of text automatically inserted at the bottom of an email message.
It typically includes basic information about the sender, such as their
- Name
- Title
- Contact information.
Email signatures are used to identify and stand out senders from the big crowd – especially in business communication and promotion.
After creating an email signature (we’ll explain it in this step-by-step guide), it’s automatically added at the end of each email you send.
Despite their simplicity, email signatures can be beneficial in business communications. Additionally, they provide a quick way for recipients to identify the sender and find their contact information. Plus, you can use email signatures to promote a business, website, or personal brand.
Here are various ways to create an email signature using the popular email providers via their desktop versions.
How To Create an Email Signature in Outlook?
Creating an email signature isn’t complicated, and it doesn’t take a long time. However, the process and approach are different in the popular email providers.
Here’s how to create an email signature in Outlook (Hotmail):
-
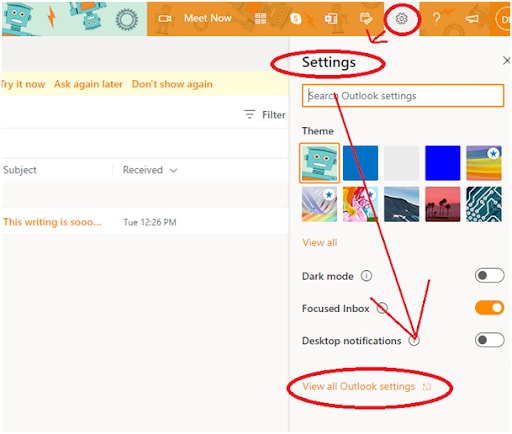
Sign in to your Outlook mail and find the ‘Settings’ tab from the main options tab – on the very right corner of your screen.
-
Tap on it and select ‘View all outlook settings.’
3. Now select Mail.
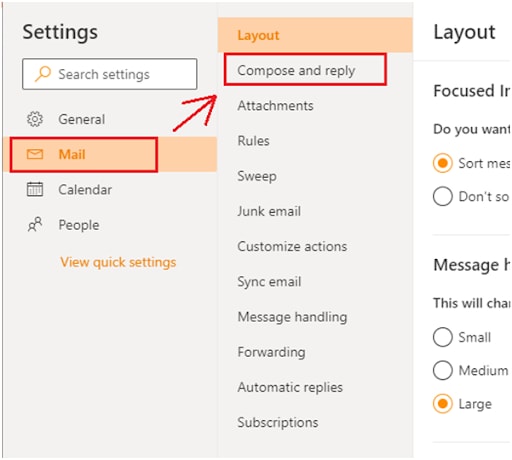
4. Select ‘Compose and reply.’
5. The next screen that appears will be devoted to the email signature.

Now, you can start writing and creating – choose all formatting options available.
Note: You can have only one email signature per account!
6. Choose your preferences for future messages.
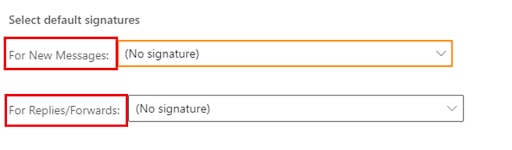
After formatting and writing your signature, don’t forget to check the section right below the box where you format the text.
Furthermore, you can choose to include your signature on each message you compose and what will be the preference for replies and forwards.
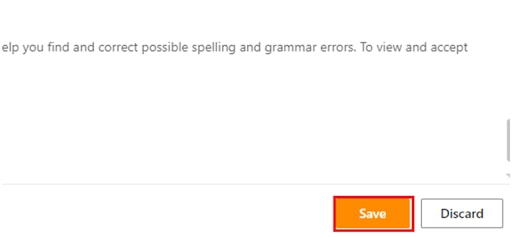
7. Don’t forget to click ‘Save’ before exiting. Otherwise, your changes won’t be saved.
But, if you already have an email signature that you want to add (manually) to a specific message, instead of managing the previously mentioned preferences; here’s what you should do:
8. Go to your Outlook email account, and select ‘New Message.’
9. Once done writing your email, click on the three dots in the last option tab.

10. Select the option ‘Insert signature.’
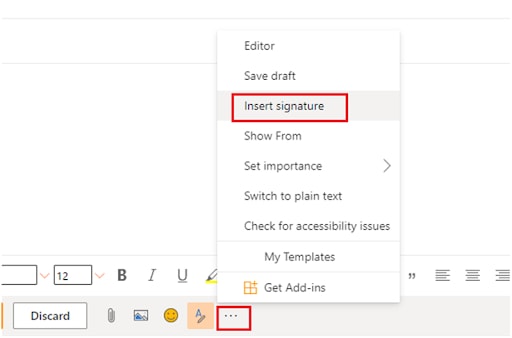
11. Finish sending your email to the preferred recipient.
How To Create An Email Signature in Gmail?
Creating your signature mark in a Gmail message is quite similar. These are the steps:
-
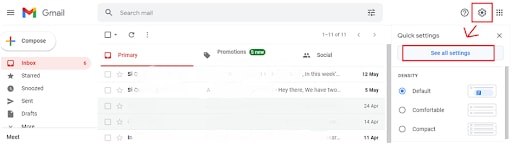
Log onto your Gmail account and find the ‘Settings’ (gear icon) in the top right corner.
-
Click on it and select See all settings.
3. Scroll down and find the Signature section.
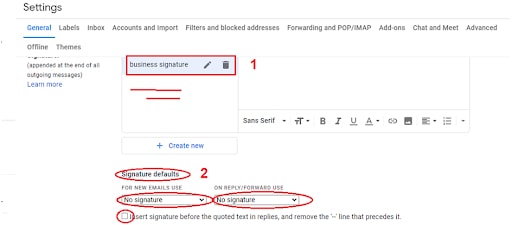
Here, you can either create a new signature or change your previous one.
4. Check the Signature defaults.
Manage your preferences and use the signature right away signature in your messages.
5. Scroll down and click on ‘Save Changes’ before exiting.

Unlike Outlook, Gmail gives you more freedom when managing email signatures. Hence, you can use more than one and manage your signatures while writing an email.
6. Sign in to your Gmail account and select ‘Compose.’
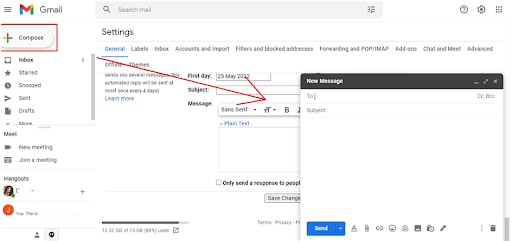
7. In the options tab below, choose ‘Insert signature’ (the icon that looks like a pen).
8. Click on ‘Manage Signatures’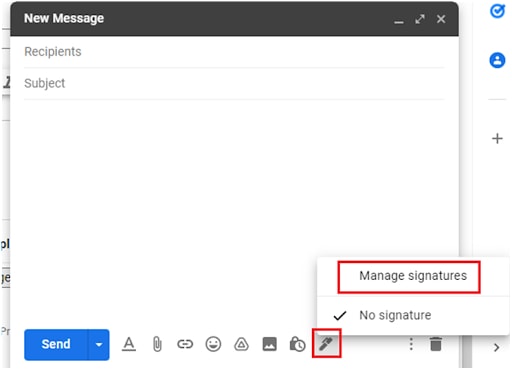
9. You’ll be once again taken to the previous menu, where you should choose to
-
enter a new signature,
-
edit signatures,
-
or remove signatures.
9. ‘Save changes’ and proceed by sending your email.
How To Create An Email Signature In Yahoo Mail?
Yahoo Mail offers its users only one signature on their email accounts. Also, it offers the simplest way to manage and create email signatures.
-
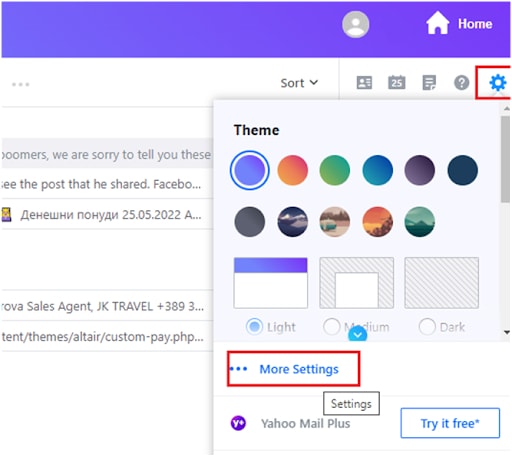
Log into your Yahoo Mail account and search for the ‘Settings’ icon.
-
Click on it, and select ‘More Settings.
3. From the left sidebar, choose ‘Writing emails.’
4. Scroll down and find Signatures.
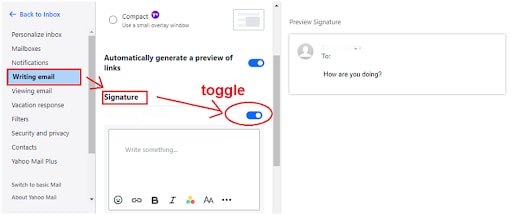
When using multiple accounts, you’ll be given the names, and next to each account, you should toggle ON the signature field. And those with a single account can toggle the ON button next to their name.
5. You can preview how your email signature would appear in an email with the ‘Preview’ option on the right.
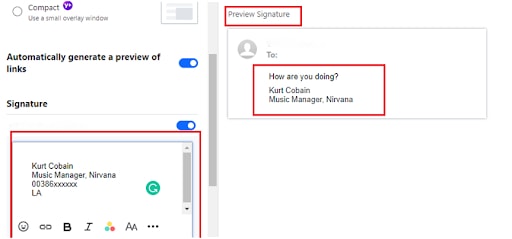
All done! Click ‘back,’ and your email signature is saved for every following email you send out.
Note: Unlike the previously mentioned email providers, Yahoo does not offer the additional settings to manage when and where your signature will be used.
When you create and turn it on, you will utilize it in each future email you create – a newly composed one, a reply, or a forward message. And you can delete it if you feel that it doesn’t belong in a specific email.
How To Create an Email Signature on Apple Mail?
Macs are a ‘world on their own.’ Creating an email signature on Mac/ Apple mail is different from the mail providers’ steps mentioned above.
-
Open and log onto your Apple Mail.
-
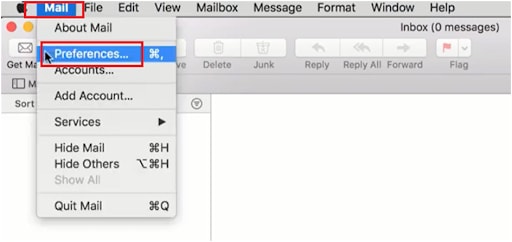
Select the Mail tab on the top left corner, and choose Preferences.
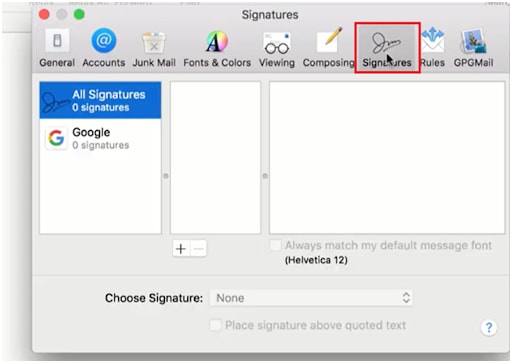
3. Find and click on Signatures from the horizontal menu at the top.
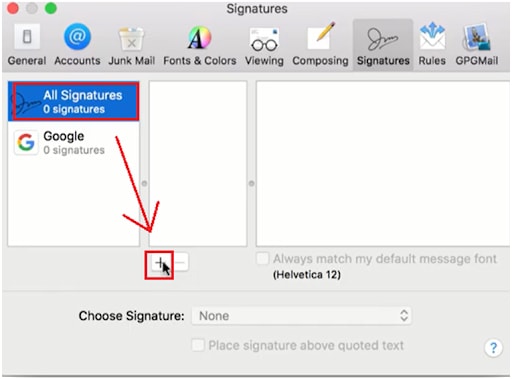
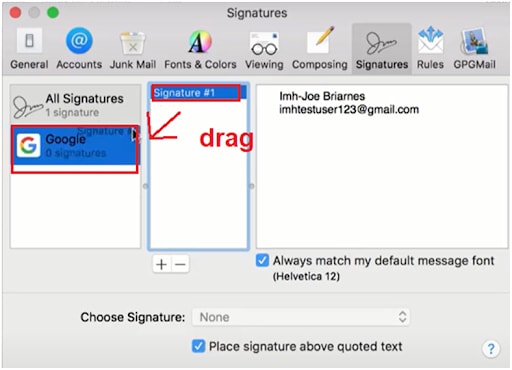
4. Choose All Signatures and click on the ‘+’ sign to add and create a new one.
5. Once created, your signature will appear in the middle section.
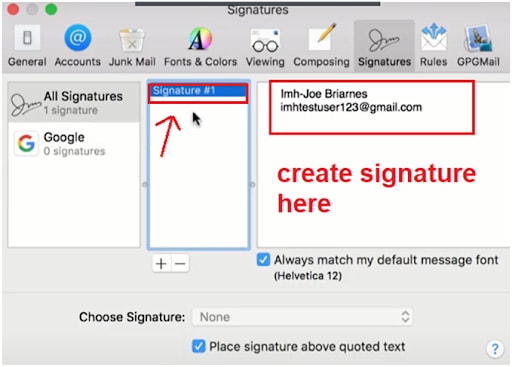
6. Drag the Signature to the Google icon to use it in other email providers.
Apple Mail offers a unique option that we can consider thoughtful and considerate, primarily since many users use Androids and regular PCs, thus different email providers.
That said, you can select and use the created signature in every email provider you’re logged onto, although it was created in Apple Mail.
How To Create An Email Signature On AOL Mail?
AOL mail is one of the world’s top 10 email providers. Here, you have the chance to go through its different settings and find a way to create/ add an email signature to your mail.
-
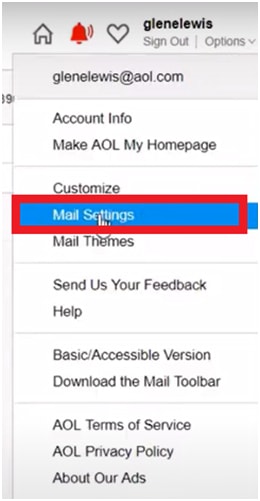
Log onto your AOL Mail account and go to ‘Options’ – located in the far right top corner on the screen.

2. Choose ‘Mail Settings’
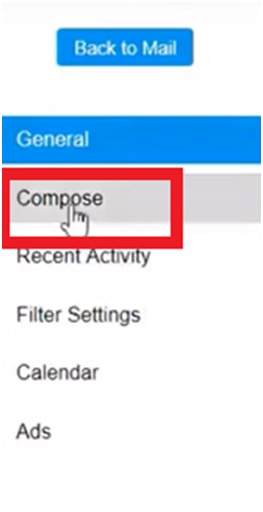
3. From the vertical side bar menu located on the left, choose ‘Compose.’
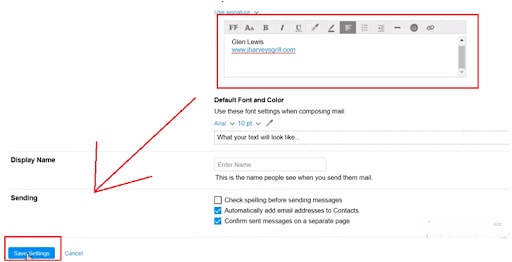
4. Then, find the Signature menu scrolling down in the ‘Rich Text/ HTML Section.’
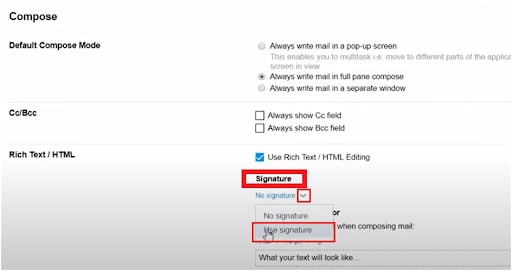
5. Select the ‘Use signature’ from the downward-facing arrow menu, and a new window will appear. Here, you can create your email signature with different options for inserting links, images, fonts, etc.
6. Once you’re done creating your signature, scroll down and select ‘Save Changes’ from the bottom left corner.
How To Create an Email Signature on ZOHO Mail?
ZOHO mail is another popular email provider with plenty of features available for your preferences. Though some people complained that the settings menu looks overcrowded, here’s a simple how-to guide with images to solve the problem of creating an email signature on ZOHO mail.
-
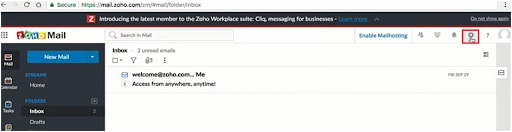
Sign in to your ZOHO mail and find the ‘Settings’ gear icon on the right corner above.
2. Find the Personalize section, and then click Signature.

3. Click on Add a new signature (the + sign). And start composing your email signature in the new window that appears.
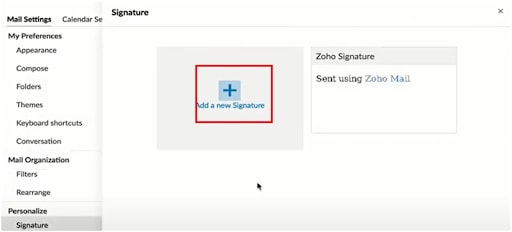
4. Create your email signature in the window that pops up next — don’t forget to click ‘Save’ before exiting.

The Elements of an Email Signature
Your email signature is the last thing people see before they click ‘Send.’ It should be concise and leave a lasting impression. These are the basic elements each email signature needs to have:
The sender’s name and the email signature are the main points – they should be written clearly, leaving no place for initials.
Adding the full title of the sender’s job/business position is crucial. This helps to establish credibility and shows the sender is the authority on the email topic.
While the presence of the department is vital for many reasons:
- your contact might want to talk to a higher official or manager,
- they might be interested in another department, etc.
-
The Company’s Name and Logo
Business relations are all about companies and brands exchanging information. Thus, adding the company’s name and logo is a way to create
- a more professional appearance,
- making a more remarkable impression,
- and promoting your brand and business.
-
The Contact Information of the Sender
The final, most basic element of an email signature is including a way to be contacted back (phone number, business email, physical address, etc.).
It’s good to add at least two options, always to have a sane alternative. At the same time, if the business is a store, adding a physical address will inspire people to come and find you, to see your products and offers, i.e., making them potential customers.

At last, these elements build up a simple email signature.
However, depending on the customization, needs, and niche backgrounds, the following building elements of a more complex email signature are often used:

Leaving a short quote in your signature can be an excellent way to add personality to your correspondence and make yourself more memorable. If you’re looking to project professionalism, you can opt for something like “The best way to predict the future is to create it.”
- Social Media Icons (linked to your business profiles)
Social presence in the future. That’s precisely why all major and successful companies are popular and present on every social media network out there.
If a business/ brand intends to stick around in the near future, it has to reach out to the youth – the generation of the Internet. Furthermore, inserting simple buttons on Instagram, Twitter, or Facebook leading to a business profile within a click is a fantastic asset in a successful email signature.

A link added to your website and your email signature can help increase traffic and boost your online visibility.
When recipients see your signature, it’s only natural for one to be curious about your business, brand, or products — and this integrated link has you covered.

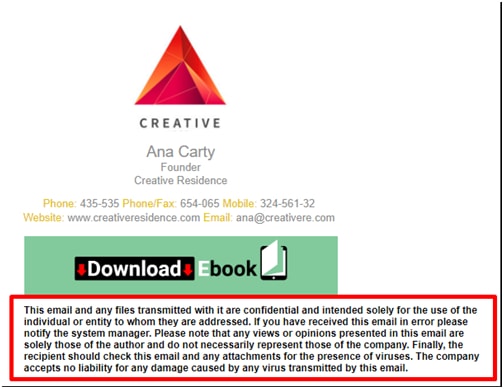
It’s always good to include a disclaimer in your signature, especially when sending professional emails.
This is a short statement that specifies your liability limits – in case something goes wrong. Or, if you’re speaking on behalf of the company and expressing personal opinions, a disclaimer like “The views expressed in this email are my own and do not necessarily represent the views of my employer” should be included.
This can protect yourself AND your company from legal action if someone takes offense from something, said or expressed in an email.
Additionally – a disclaimer can also help prevent spam and other unwanted emails.
An excellent way to add extra information about a current promotion, discount, a new product release, etc. – is by inserting a banner.
It’s a separate section of an email signature that, when clicked, can take you directly to the section of your business that you’re aiming to popularize or promote.
Caution: Careful how you’re using banners in an email signature — don’t turn it into a ‘burdening promotion pamphlet.’

Finishing Thoughts
There you have it – the basics on such a broad topic.
There’s much, MUCH more to discuss, but we’ve touched on the essence of creating an email signature in pretty much all of the widely used email providers.
You must create an email signature to stand out from the crowd – represent consistency, and raise your brand image and awareness among your recipients (regular business partners, potential new customers, or collaborators).
Before we finish, here is something regarding the signature formatting to never forget:
- DO make it mobile-friendly since around half of the world’s population checks their email through mobile devices.
- DON’T make it an image – you can insert an image to go along with the text, but don’t rely entirely on media. A bad internet connection can block your logo from appearing along with the text – prevent this from happening.
